
You’ve waited patiently for weeks on end for your new bow to arrive, and when it finally does, all you seem to have is a box of bits. Now you have to go and learn how to set up a target recurve bow!
When learning how to set up a target recurve bow, make sure that you have all the relevant parts you need for the bow before you start. Focus on fitting one part at a time before moving on to the next.
In this article, we’ll lay out each step in the process of setting up your first Target Recurve bow from unboxing it, to taking your first shot.
How to Set Up a Target Recurve Bow: A Complete Guide
For the purposes of this article, we’re going to assume that you’ve bought a Target Recurve Bow online with all the accessories needed for a full set-up.
Unboxing Checklist
Once you’ve unboxed all the separate parts, before you get started with the assembly, make sure that the box contains everything you need!
- Riser
- Limbs
- Bowstring
- Bow Stringer
- Arrow Rest
- Sight
- Plunger Button
- Stabilisers
- Clicker
- Allen Keys
- Brace Height Gauge
- Nock Point Thread
You’ll also need a cigarette lighter handy for when you tie on your nocking point.
Bow Assembly
We’ll start from scratch and work our way through each point. The video below will provide a follow-along visual aid if you prefer not to read through down to the end!
Riser
Starting with the central hub of your bow, otherwise known as the riser, or grip. This forms the foundation of your bow and houses all the bushings needed for attaching every accessory you’ll need.
ILF Limbs
ILF limbs (International Limb Fitting) are easily fitted to your bow. Each limb has a dovetail unit at each end which can then be fitted into the corresponding socket on the riser.
The bottom limb is usually marked so that you know which limb goes where. The limbs may seem loose in the riser grove but that’s something that we can address later on when we look at tillering the bow.
Once you’ve slotted both limbs into place, you can move on to stringing the bow.
Stringing The Bow
Your bow should come with a bowstring, and for stringing the bow, we’re going to need the bow stringer.
The string will have a big loop and a small loop. The big loop goes at the top and slides down the limb, while the small loop goes at the bottom and slips over the limb tip to rest in the string groove.
Now we come to the stringer. The stringer has a pocket on one end which goes over the limb tip with the string in the string groove.
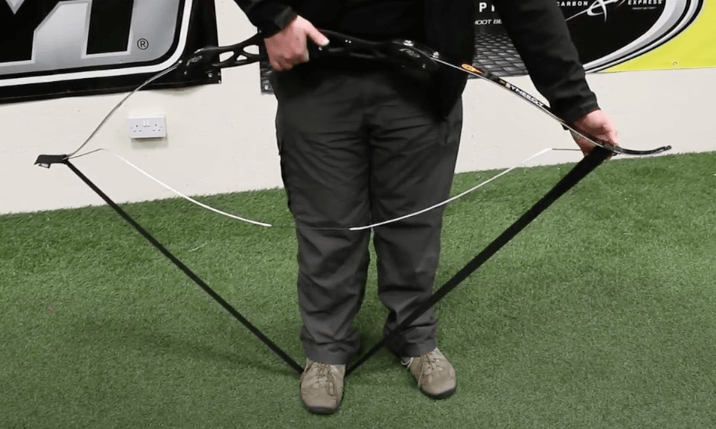
At the other end of the stringer is a loop, or saddle, which slips over the limb just below the string,
Then you place your foot on the strap and pull the bow up until you can slip the loop over the limb tip. Then you release the bow slowly to allow tension on the string.
Check to make sure that the string is correctly aligned in the string groove.
If you struggle with the weight of the bow, you can use both feet or even tie knots in the stringer to make it shorter.
To unstring the bow, just do the reverse of the above.
Related: What Are All The Parts On An Olympic Recurve Bow?
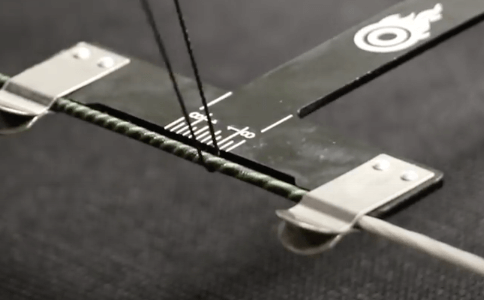
Setting The Brace Height
Brace height is the measurement from the deepest part of the riser to the bowstring
Using the brace height gauge, we can check the brace height by placing the T end of the gauge against the neck of the riser, and then measuring the distance between the riser and the bowstring.
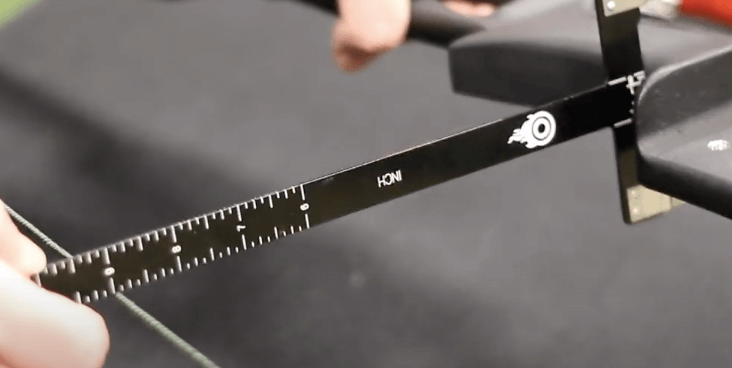
An over-braced bow will become slower, while an under-braced bow will be faster, but it will sound like a bag of spanners.
On a 68″ bow, you can expect a starting brace height of around 8.5 – 8.75″. If your brace height is higher than that, then to adjust it, you’ll need to unstring the bow and remove a couple of string twists. This will give you a shorter string and a lower brace height.
Same thing for a brace height that’s too low. Remove the string and add a couple of string twists, then re-measure the brace height.
You can always check your bow manufacturer’s guidelines for brace height just to be on the safe side. Or you can read this article that covers all you need to know about brace height for a Recurve Bow.
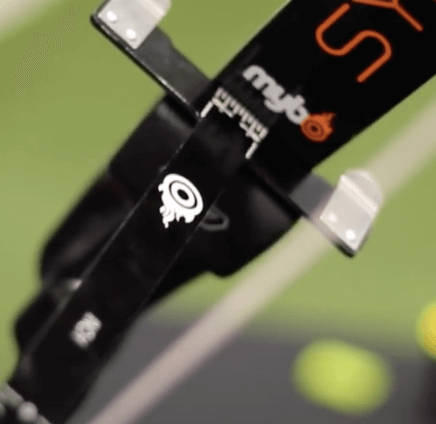
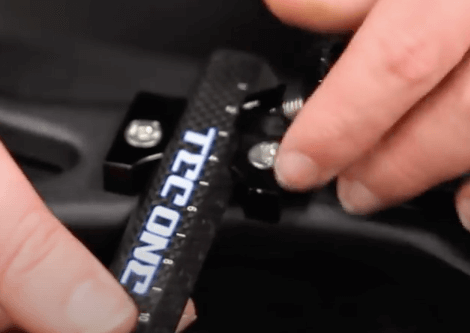
Setting The Tiller
One of the most important stages to consider when you set up a target recurve bow, or any bow for that matter is the tiller of the bow. This is basically how strong one limb is in relation to the other. You can measure this using your brace height gauge. Place the ‘T’ end of the gauge against the point where the limb meets the riser on the top limb, and measure the distance to the string.
Then compare that same distance with the measurement from the bottom limb.
When you set up a target recurve bow, it needs to have quite a bit of tiller to it. Therefore the bottom limb should be a significantly different measurement than the top limb.
Target Recurve Bow Tiller
The reason for that is that on a target set-up, you shoot one finger above and two below where the arrow is, but the centre of the bow is down at the throat of the grip. This means that you won’t be pulling the arrow back in line with the grip.
In order to balance that out, you’ll need to have a little extra tiller on the bottom limb.
It would be different if you were shooting barebow with three fingers under the arrow as that would bring the line of the pullback in line creating zero tiller.
To adjust the tiller, you’ll need the two allen keys that came with the bow. The bigger allen key goes into the tiller bolt on the front of the riser, while the smaller one goes into the locking screw on the back.
Make sure to unstring the bow before adjusting the tiller to make sure you don’t damage the limbs.
In this example, our bottom limb is stronger than the top limb, so we’ll add a little poundage to the top limb.
To do that, we’ll adjust the tiller bolt to change the limb angle which will increase the poundage by a slight margin.
One other thing to note is that you can change the entire poundage of the bow using the tiller bolts, which is definitely not recommended!
- Loosen the locking screw on the back of the tiller bolt
- Turn the tiller bolt at the front by the number of turns needed to achieve the desired tiller. Usually in quarter-inch increments.
- Nip the tiller bolt back up. Then restring the bow.
- Once you’ve made the adjustments, re-measure the tiller with the brace height gauge.
- Re-tighten both locking screws.
Checking Limb Alignment
Once you get going, one thing you’ll need to double-check is whether or not the bow is perfectly straight.
Rest one end of the bow on a table and look down the length of the string to make sure that there is no twisting of the limbs.
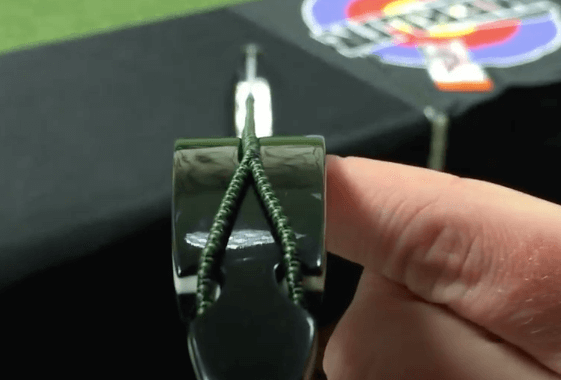
If you do have a slight bias to one side, you can adjust this by using the allen key in the bolts on each side of the top end of the riser. Tighten on one side and loosen up on the other to shift the limb left and right in the limb pocket until you get perfect alignment.
Fitting The Arrow Rest
A wire rest is highly adjustable and can move up and down or in and out.
Peel the backing off and apply the rest to the riser.
You can also use an alcohol wipe to give the riser a clean at this point. Some folks feel uneasy using a stick on rest if the surface hasn’t been cleaned prior to sticking.
Drop it down so that the hole lines up with the hole for the pressure button. Then apply a decent amount of pressure to get it to stick.
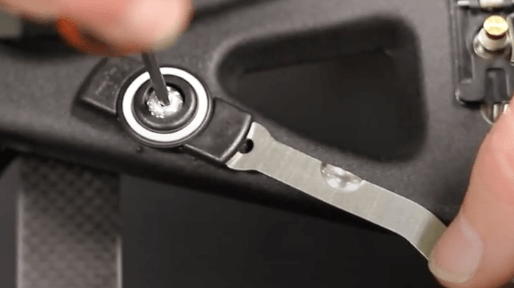
Installing The Pressure Button
A pressure button is a device that allows you to tune your arrows. The spring in the button applies pressure to the side of the arrow which allows you to overcome the archer’s paradox and get the best arrow flight possible.
If your arrow is too weak, you apply more pressure, and if the arrow is too stiff, you take pressure off the button.
Screw the pressure into the hole on the side of the riser.
You can also take the button apart and change the spring inside it to help improve arrow flight.
To adjust the pressure on the pressure button, you simply use an allen key to loosen off the locking screw on the side of the button wheel.
Once the locking screw is released, you can use the allen key to adjust the pressure.
Setting Up The Centre Shot
At this point, we need to talk a little about arrow selection. There is a whole range of arrows available, from big fat aluminium arrows right down to tiny carbon arrows.
Selecting the right spine arrow for your bow is going to be critical, which is a whole other article in itself, and fortunately, as luck would have it, you can read it right here.
To set the centre shot, we need to nock an arrow onto the string. Preferably the correctly spined arrow, or one that has the same diameter as your preferred arrow spine.
Make sure that the string is centred over the riser, then look at where the point of the arrow sits.
For a right-handed archer, we want the point of the arrow to be slightly to the left of the string. Vice versa for a lefty.
To adjust this, we need our allen key again.
Loosen off the collar for the plunger button so that you can turn it to get the pressure button setting that you need. Then tighten back up again once you’re done.
Next, you need to look at how the arrow runs through the centre of the pressure button. If it’s a little too high or low, you’ll need to take the small allen key that came with the rest and loosen it off so that the wire free’s up enough to adjust it up or down as needed.
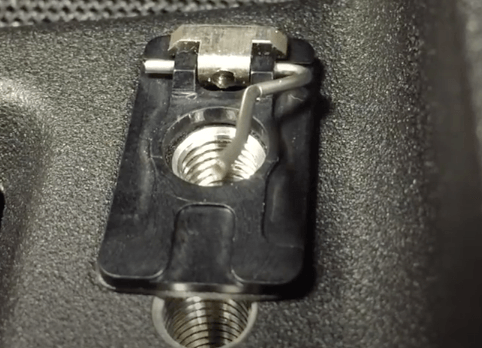
Fitting The Nocking Point
Having already set the tiller at a 1/4″, you’re going to set the top of the bottom nocking point 1/4″ above square.
Using the brace height gauge again, take your nocking point thread and tie your first knot onto the string at the 1/4″ mark. A simple knot will do but make sure to pull it extra tight. Next, tie multiple knots at the top and bottom of the string, alternating as you go. Aim for between 4-6 knots in total.
Tie off the last knot, then burn through the string with your lighter, melt the end off, and then dab the end against the nocking point to completely seal it in.
To add the second point, nock an arrow onto the string to get the correct distance, then repeat the same process over again.
Attaching The Sight
Remove the sight block for the sight and place it on the riser. Then taking your fallen key, secure the block to the riser with the attaching screw.
Once the block is mounted, you can slide the sight into it. Set your desired length before tightening in place with the sight block wheel.
Next, take the sight pin and slot it onto the front of the sight and tighten it up.
Now you can align the sight with the centre shot by turning the sight pin. Typically you want to have the sight pin slightly to the left of the string when lining the string up down the centre of the riser.
Adding The Stabilisers
The purpose of the stabilisers is to add weight a long way from the bow and provide stability to allow the archer to hold on target for much longer.
The stabiliser comprises five parts in total:
- An Extender
- V Bar Mount
- Long Rod
- 2 x Side Rods
First, you attach the extender to the front of the riser. Then take the v-bar and attach it to the extender.
Next up is the long rod which screws into the front of the v-bar extending towards the target.
Then the two side rods attach to the sides of the v-bar pointing back towards the archer.
Balancing The Bow
Once you have fitted the stabilisers to the bow, this is a good point to check the bow’s balance.
To check left and right balance you can turn the bow upside down and balance it across your index finger just below the grip. If you see any lean to the left or right, you’ll need to add weight to balance out the bow.
Typically you might find that you have more lean on the sight side of the bow due to the extra weight. To correct the balance you can add an additional base weight to the opposite side rod on the stabiliser.
You can also check the centre of gravity of the bow from front to back by placing the bow on your index finger roughly an inch away from the front of the grip.
Fitting The Clicker
The clicker is essentially a way to measure the correct draw length for each shot taken. It’s not really something that is recommended for beginners, but something that a coach might suggest that you use after around 6-12 months after starting to shoot.
The clicker is a strip of metal that sits over the arrow. When the arrow is pulled to full draw, the strip of metal will click off the arrow, signally the perfect moment to release.
To instal the clicker you must first screw in the clicker extender which goes just on the front of the riser.
Next, you can attach the clicker strip to either one of the two holes on the riser, using an allen key.
The clicker needs to be set up to your own draw length in order for it to work for you and not against you. If you’re in any doubt as to how to set it to your draw length, you can ask a coach or someone at your local pro shop.
Final Thoughts
With all the different parts that can be added when you set up a target recurve, it can be a little intimidating to know where to start with assembly, but if take a step back and start with one piece at a time, in the right sequence, you can have your bow set up in no time.
We hope this guide helps you to break down and simplify the process!
0 Comments