
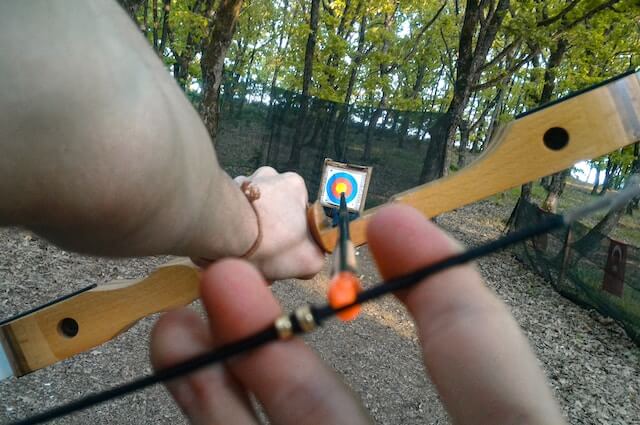
Setting the nock point correctly is a crucial step for any archer seeking accurate and consistent arrow flight. The nock point, as the name suggests, is the specific location on the bowstring where you attach the arrow’s nock.
While it may seem like a minor detail, its impact on your shooting performance cannot be overstated. A properly positioned nocking point ensures that your arrows leave the bow at an optimal angle and that they are released consistently, resulting in improved accuracy and tighter groupings.
Setting a nock point ensures proper arrow alignment on the bowstring. To set a nock point:
- Use a bow square to find the correct position on the string, typically slightly above square for most archers.
- Mark the position with a pencil or marker.
- Attach a metal or string nocking point to the marked position using nocking pliers.
- Test shoot and adjust as necessary for optimal arrow flight. Proper nock point placement is crucial for consistent accuracy in archery.
In this article, we’ll give you a rundown of how to set up your nocking point correctly for brass and serving nock points. Plus, we’ll look at how best to maintain those nocking points to for the best longevity possible.
Importance Of Setting The Nock Point
Why is setting the nock point correctly so vital? Well, imagine shooting arrows with inconsistent and unpredictable flight patterns.
Not only would it be frustrating, but it could also lead to missed targets or even accidents. By establishing a precise and consistent position for your arrow’s nock on the bowstring, you create a reliable reference point for every shot you take.
Moreover, an accurately set nock point allows for better energy transfer from the bow to the arrow upon release. This increased efficiency translates into greater arrow speed and potentially flatter trajectory, making it easier to hit your desired target with accuracy.
What Is A Nock Point?
Essentially, a nock point is a specific location on the bowstring where you position the arrow’s nock. This seemingly simple adjustment plays a vital role in ensuring consistent arrow flight and accurate shots.
Purpose of a Nock Point
The nocking point serves as an anchor for your arrow, securing it firmly onto the bowstring. By consistently placing the arrow at the same spot, you optimize your chances of achieving repeatable accuracy.
It acts as a reference point for consistent release, reducing variations that can impact arrow trajectory during every shot.
Different Types of Nock Points (Fixed, Adjustable, Tied-On)
There are various types of nock points available to suit different needs and preferences. Fixed nock points are commonly used by beginners or archers who prefer a permanent position for their arrows.
These are often made from brass or aluminum and attached to the bowstring using serving thread. An alternative option is adjustable nock points that allow fine-tuning of your arrow’s position on the go.
Typically made from brass or aluminum, these handy gadgets provide flexibility in adjusting vertical and horizontal positioning according to individual shooting styles and preferences. A third option involves tying on a nocking point using serving thread or dental floss.
This method allows customization by determining your preferred location precisely. It requires knot-tying skills or assistance from experienced archers but offers versatility in finding that sweet spot tailored to your shooting style.
Materials Used for Creating a Nock Point
The choice of materials for creating a nock point depends on personal preference, durability, and ease of installation. Serving thread is a popular choice for both fixed and tied-on nock points.
It is made from durable polyester or nylon fibers, ensuring long-lasting performance even under the stress of repetitive shooting. For adjustable nock points, brass or aluminum nock sets are commonly used due to their durability and ease of adjustment.
These small accessories often come with set screws or clamps that allow precise positioning along the bowstring. Ultimately, the material you choose for your nock point should offer reliability, maintain its position during shots, and withstand the force exerted by your bowstring upon release.
Tools and Materials Needed
Bow Square
When it comes to setting your nock point with precision, a bow square is an indispensable tool. This nifty gadget resembles an L-shaped ruler and is designed specifically for archery enthusiasts.
One end of the bow square has a T-shaped slot that allows you to slide it onto your bowstring, while the other end provides measurements in inches or millimetres.
The purpose of the bow square is to help you measure the brace height accurately, which is crucial for determining the initial position of your nock point.
By placing the bow square against your riser and sliding it down until it reaches the string, you can ensure consistency in setting up your nocking point.
String Wax
String wax may seem like a mundane item, but its importance cannot be overstated when it comes to maintaining both your string and nocking point.
Regular application of string wax not only prolongs the life of your bowstring but also enhances its performance by reducing friction between fibers.
By lubricating your string with this waxy goodness, you minimize wear and tear on both ends of your string where contact with the nock set occurs during every shot.
This helps maintain a consistent release each time you draw your bow, ultimately improving accuracy. So, don’t forget to regularly apply some good quality string wax along those well-used areas.
Nocking Pliers
Nocking pliers are like specialized pliers specifically designed to assist archers in adjusting or installing a new nocking point on their strings easily.
Serving Thread / Brass Nocking Point
If you’re tying on your nock points, then serving thread is going to be your best bet. Make sure that you have determined your nock point beforehand.
These handy tools usually consist of two concave jaws that mimic the shape of the nock, allowing for a secure grip without causing damage.
The primary purpose of nocking pliers is to ensure a firm and tight fit between the string and the nock, preventing any unwanted slippage during the shot.
Additionally, they are invaluable when it comes to tying on a new fixed nock point using serving thread.
Nocking pliers help tighten the serving thread around the string, keeping your nock point stable shot by shot.
With a bow square, string wax, and nocking pliers in your toolkit, you’re ready to set and maintain your nock point for the best performance, whether on the range or in the field.
Determining the Initial Nock Point Position
When it comes to setting your nock point, determining the initial position is crucial for achieving optimal arrow flight.
To start, you’ll need a bow square, which is a handy tool that helps measure brace height accurately and locate the proper position for your nock point.
Simply attach the bow square to your bowstring and slide it up until it rests against the grip of your bow.
Using a Bow Square to Measure Brace Height
The brace height is the gap between the bow grip’s deepest part and the string’s touch point on the bow’s belly.
To measure, hold your bow upright. With one hand on the grip, use the other to pull the string to the arrow rest’s bottom.
Then, adjust the square until it touches both the grip and arrow rest at the same time.
Adjusting Nock Height for Different Shooting Styles
If you shoot with 3 fingers under, consider increasing the nock height to 1/8 of an inch higher to make it half an inch higher than the centre point.
If you’re a split-finger shooter, then you want to aim for 5/8 of an inch above the centre, with the centre being the base of the T-square.
This is to account for the way that archers with different shooting styles will place pressure on the limbs with a different hook on the string. The different nock heights will maintain a better balance and therefore more consistent arrow flight.
Fine-Tuning the Nock Point Position
Paper tuning: How it helps determine arrow flight consistency
When it comes to achieving optimal accuracy and consistency in archery, paper tuning is an invaluable technique. This process involves shooting arrows through a sheet of paper to analyze their flight characteristics.
By examining the resulting tears on the paper, you can gather crucial information about your arrow’s trajectory and adjust your nock point accordingly.
Paper tuning allows you to fine-tune both the vertical and horizontal alignment of your arrow.
Adjusting vertical position based on paper tear analysis
Once you’ve shot an arrow through the paper, carefully observe the tear it creates. If the tear indicates that your nocking point is too high, with a tail-high tear on the bottom half of the hole, you should lower your nock point slightly.
On the other hand, if there is a tail-low tear at the bottom half of the hole, it means your nocking point may be too low and needs upward adjustment.
It’s important to make small adjustments at a time to accurately find that sweet spot where tears are centered and straight.
Correcting horizontal position by examining left/right tears
To determine whether your horizontal alignment is correct or not, observe any left or right tears in conjunction with vertical tears.
A perfectly tuned bow should result in clean holes without any noticeable tail-left or tail-right tears.
However, if you notice a leftward tear along with vertical inconsistencies, try adjusting your rest or center-shot alignment accordingly.
If there’s a rightward tear with vertical variations, adjust it. Aim for balanced tears or none at all.
During paper tuning, study both vertical and horizontal tears. This helps archers understand their bow setup. They can then adjust for better arrow flight. Patience and detail are crucial. Proper nock point tuning ensures accuracy and a great archery experience.
Tying On or Adjusting the Nock Point
When it comes to tying on a new fixed nock point, serving thread is your go-to tool. It’s important to note that you should have already determined the ideal position for your nock point before starting this process.
To begin, take a length of serving thread and double it over, forming a loop on one end.
Insert the loop through the center of your bowstring, just below your desired nock point position. Now, pass both ends of the thread through this loop and pull firmly to create a secure knot around the bowstring.
Next, take one end of the thread and start wrapping it tightly around the bowstring in an upward spiral motion. Aim for around 5-7 wraps and ensure they are snugly placed together without any gaps.
After completing the wraps, secure the end by passing it through one of the loops created at the very beginning. Use scissors to neatly trim off any excess thread but leave a small tail for added security.
Using adjustable brass or aluminum nock sets
For those who prefer more flexibility in adjusting their nock point, using adjustable brass or aluminum nock sets can be an excellent choice.
These sets usually consist of two pieces – a threaded piece that screws into place and another piece that holds your arrow snugly in position.
First, match the threaded piece with the desired nock point position on your bowstring. Tighten it, using pliers if needed.
Next, slide the second piece (that holds the arrow) onto the bowstring until it touches the threaded piece.
Adjust the position of the nock point as needed by loosening the locking mechanism and sliding it up or down the threaded piece.
Once you’ve found the perfect position, tighten the locking mechanism again to ensure a secure hold for your arrow.
By following these step-by-step instructions, you can confidently tie on a new fixed nock point or utilize adjustable brass or aluminum nock sets to achieve precise adjustments.
Remember, practice and experimentation are key to finding your ideal nock point position that enhances your shooting performance and accuracy.
Checking and Maintaining Your Nock Point Regularly
Inspecting string wear near the nock point
Regularly inspecting the area around your nock point is crucial to ensure optimal performance and safety. Look for any signs of fraying, unraveling, or damage in the string.
Fraying can occur due to continuous use or improper installation of the nock point. If you notice any loose strands or significant wear, it’s essential to take immediate action to prevent further damage and potential accidents.
Replacing worn-out or damaged nock points
When you identify a worn-out or damaged nock point during inspection, it’s time for a replacement. Worn-out points can negatively impact arrow flight and accuracy.
To replace a fixed nock point, remove the old one using serving thread and tie a new one tightly.
For adjustable brass or aluminum nock sets, just loosen the screw, slide off the old one, and attach a new one.
FAQs
Where should I set my nocking point?
Above the arrow, at a 90-degree angle to the bowstring.
How high should my nocking point be?
Typically, 1/8 to 1/4 inch above square (90 degrees) for finger shooters
What happens if nocking point is too high?
The arrow may tail-down during flight, affecting accuracy.
How do you adjust arrow nocks?
Use nocking pliers to move or reset the nocking point on the bowstring.
Conclusion
Setting your bow’s nock point correctly is an essential aspect of archery that should not be overlooked.
Regularly check for wear like frayed strings near the nock point. This keeps your equipment ready for accurate shooting.
Remember, replacing worn-out or damaged nock points is crucial to maintain optimal arrow flight consistency and precision.
By dedicating some time to these routine checks and maintenance tasks, you can elevate your archery experience while enjoying improved performance with every shot you take.
Keep up with these simple steps, stay diligent in caring for your equipment, and watch as your skills soar higher than ever before!
Remarkable! Its in fact amazing post, I have
got much clear idea on the topic of from this article.
Thanks! Glad you got something from it!
It is not my first time to pay a visit this website, i am visiting this web page
dailly and get nice information from here daily.
Thanks! We’re glad to have you here!
I just like the valuable information you supply to your articles.
I’ll bookmark your weblog and check again right here frequently.
I’m reasonably sure I will be informed plenty of new stuff
right right here! Best of luck for the following!
Thanks! I really appeciate the feedback!
What’s up, I log on to your new stuff on a regular basis.
Your humoristic style is awesome, keep up the good work!
Thanks! Great to have you here. Really appreciate the feedback!
There is certainly a lot to know about this subject.
I love all the points you made.
Thanks for the feedback. Much appreciated!