
With its origins in the East, the thumb draw is usually associated with composite bows or Asiatic bows. But due to a rise in popularity, the thumb draw is gaining in popularity in the West.
This leaves many people who don’t have either of these types of bows in a bit of a bind when it comes to learning the technique. So we now have to ask the question: Can you learn to thumb draw on a recurve bow?
In general, when people use the thumb draw, the bow will be left-handed, as the arrow needs to be placed on the right side of the riser. However, you can still use a right-handed recurve bow to learn how to thumb draw as long as you’re using a technique known as ‘string walking.’
This means ‘walking’ your fingers down the bow string an inch so as not to touch the arrow. You’ll be relying on the rest in the traditional way instead of using your index finger to apply pressure on the arrow to keep it in place.
Shooting with a thumb draw can feel awkward at first. If you’re used to shooting with the more traditional Mediterranean ‘three-finger draw’, then consistent practice at shorter ranges will pay off in abundance. When learning the thumb draw on a recurve bow, there are a couple of points to cover if you still want to see those consistent groupings!
Is It Difficult to Learn The Thumb Draw On A Recurve Bow?
Recurve bows are designed with the arrow rest on the left side of the bow for a right-handed archer, and on the right side for a left-hander.
You won’t be able to shoot with a thumb draw unless you use a left-handed recurve bow. So for the right-handers, you would simply put the left-handed bow in your right hand.
Learning the thumb draw on the recurve bow with a right-handed bow is possible by using a technique called ‘string walking’
Place the arrow on the rest in the usual way, but instead of holding the arrow in place with the index finger, ‘walk’ your fingers an inch down the bowstring.
You can still use the thumb draw but without the need for applying pressure on the arrow with your index finger to hold it in place.
Adjust your sight picture as you won’t be able to see past the riser.
It will take time and patience to get used to it. You may find that your arrows shoot slightly to the left or right until you can dial everything in.
What Is The Thumb Draw?
Traditionally the thumb draw was used in Asia and the Far East by archers who rode on horseback. They needed a technique that enabled the archer to keep the arrow on the bow while galloping at speed.
Placing the arrow on the left side of the bow didn’t work as the arrow would bounce around too much.
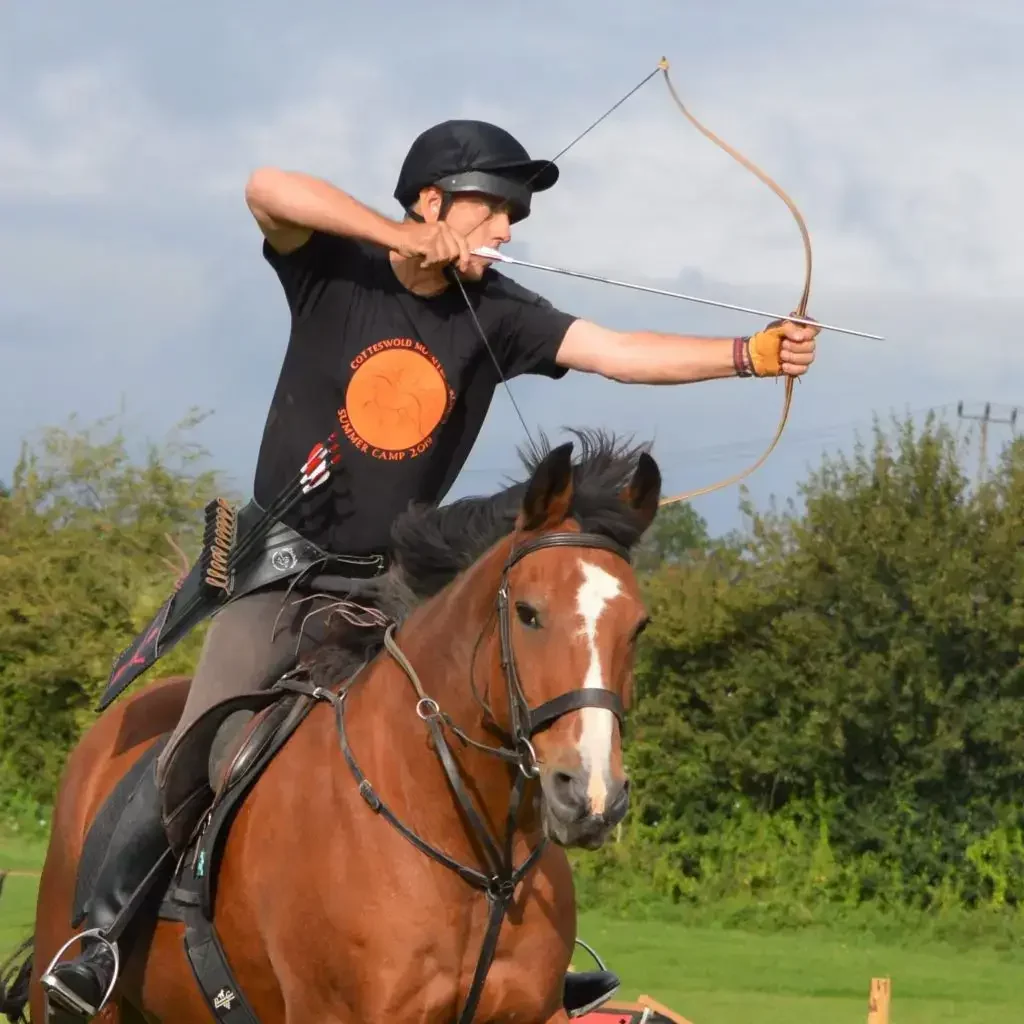
The thumb draw places the arrow on the opposite side, enabling the archer to keep control of the arrow.
The thumb wraps around the bowstring until it’s secured in the crease of the thumb. The index finger is used to apply pressure to the end of the arrow. This keeps it in place no matter what position the bow is in. The closest thing I can compare the thumb draw grip with is the hook grip from weight-lifting.
Pros And Cons of The Thumb Draw
Pros
- Perfect for speed shooting – a faster technique for nocking arrows
- The arrow is more stable against the bow – great for archery on horseback. More freedom to run, jump, aim and shoot without the arrow falling off the rest.
- Positioning of the hand makes it easier on the wrist and forearm muscles. (If you see an archer using a mechanical release, their hand is in the exact same position as the thumb draw)
- Less restrictive than Mediterranean draw – allows you to shoot from multiple angles and directions.
- Allows you to hold multiple arrows in your draw hand.
- Easier to obtain faster arrow speeds.
- Gives you a cleaner release (if a thumb ring is used)
- Increased draw weight – because the thumb is the strongest digit, you can pull back and hold heavier draw weights.
- Great for learning to shoot instinctively as you won’t be able to see past the riser to get a clear aim.
Cons
- Harder to master the technique – there are more nuances and complexities to the thumb draw. Therefore the thumb draw has a much steeper learning curve.
- Harder to be accurate – the eye will be on the opposite side of the bow to your arrow, changing your sight picture.
- More chance of errors – The thumb draw is not a forgiving technique. Because of the complexities involved, be prepared to make plenty of mistakes as you learn.
- You’ll need to invest in either a left-handed bow or an Asiatic bow if the thumb draw is your preferred method of shooting.
Conclusion
Learning to shoot using the thumb draw on a recurve bow is definitely possible. Make certain adjustments in order to sight your arrows in because you can’t see past the riser. But it will still be possible to see where your arrow is heading.
This makes for a great technique to use if you want to practice instinctive shooting. With a little more practice this should come easily.
Placing the left-handed bow in your left hand will feel odd at first due to the contours of the grip. You will get used to this after you’ve shot a few arrows.
String walking is a method that you can use with a thumb draw on a right-handed bow. You’ll be using the arrow rest in the normal way, so there’s no need for contact with the arrow. But you’ll still get all the benefits of using the thumb draw with a modern recurve.
0 Comments